显示捕获
display_capture 测试适配器使用摄像头捕获并分析显示输出,以验证显示驱动功能。它与 pytest 集成,通过视频指纹执行自动化视觉测试。
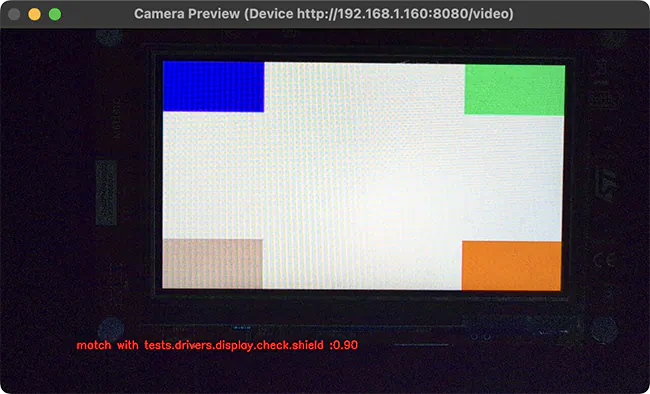
硬件设置
显示捕获测试适配器需要:
兼容 UVC、至少 200 万像素的摄像头,例如 1080p 分辨率
遮光外壳或黑色幕布,以保持照明一致
连接摄像头的 PC 主机,用于捕获显示输出
DUT 连接同一 PC,以便烧录及访问串行控制台
配置
该适配器使用 YAML 配置文件定义摄像头设置、测试参数及视频签名分析选项。典型配置如下:
 case_config:
   device_id: 0
   res_x: 1280
   res_y: 720
   fps: 30
   run_time: 20
 test:
   timeout: 30
   prompt: "screen starts"
   expect: ["tests.drivers.display.check.shield"]
 plugins:
   - name: signature
     module: plugins.signature_plugin
     class: VideoSignaturePlugin
     status: enable
     config:
       operations: "compare"  # or "generate"
       metadata:
         name: "tests.drivers.display.check.shield"
         platform: "frdm_mcxn947"
       directory: "./fingerprints"
       duration: 100
       method: "combined"
       threshold: 0.65
       phash_weight: 0.35
       dhash_weight: 0.25
       histogram_weight: 0.2
       edge_ratio_weight: 0.1
       gradient_hist_weight: 0.1
case_config:定义摄像头通用设置和测试持续时间。device_id:摄像头设备 ID,默认为 0。可使用任意有效的 OpenCV 摄像头标识,包括:本地摄像头用整数标识,第一个为 0,第二个为 1,以此类推。
设备路径字符串,例如 Linux 上的
/dev/video0。网络摄像头的 IP 视频流 URL,例如
rtsp://192.168.1.100:8554/stream。
res_x:摄像头水平分辨率,整数,默认 1280。res_y:摄像头垂直分辨率,整数,默认 720。fps:摄像头每秒帧数,整数,默认 30。run_time:测试持续秒数,整数,默认 20。
test:包含设备交互的测试配置。timeout:等待设备 UART 输出出现提示符的最长秒数,整数,默认 30。prompt:开始显示捕获前,在设备 UART 输出中等待的字符串模式。可以是正则表达式;字符串,默认uart:~$。expect:预期测试结果字符串列表,必须与应用返回的结果匹配。捕获结果与此列表一致时测试通过;字符串列表,默认['PASS']。
plugins:配置处理摄像头帧的插件。目前仅支持VideoSignaturePlugin,其配置选项如下:operations:运行测试时执行的操作,字符串。必须设为generate以捕获指纹,或设为compare以将捕获指纹与参考指纹比较。metadata:用于识别指纹的元数据,可选。name:测试用例名称标识,字符串。platform:目标平台标识,字符串。
directory:存放指纹的目录,字符串,默认./fingerprints。duration:要分析的帧数,整数。帧数越多耗时越长,但指纹更准确。method:生成显示指纹的方法,字符串,默认combined。必须为phash、dhash、histogram或combined之一。phash(感知哈希)捕获整体视觉结构和布局,最适合检测主要渲染问题,例如 UI 元素位置错误。
dhash(差值哈希)检测亮度模式和渐变,对对比度变化敏感,例如亮度或对比度问题。
histogram(颜色直方图)分析颜色分布,能快速检测明显的颜色问题,例如颜色交换错误。
combined(推荐方法)对所有方法加权组合(见下文
method_weight选项),实现稳健比较,兼顾明显和细微的视觉问题。
threshold:参考指纹与捕获指纹的相似度超过此阈值即认为匹配;可选浮点数,默认 0.65。phash_weight:phash 方法权重,可选浮点数,默认 0.35。dhash_weight:dhash 方法权重,可选浮点数,默认 0.25。histogram_weight:histogram 方法权重,可选浮点数,默认 0.2。gradient_hist_weight:梯度直方图方法权重,可选浮点数,默认 0.1。edge_ratio_weight:边缘比例方法权重,可选浮点数,默认 0.1。
配置文件路径通过测试 testcase.yaml 中的 display_capture_config 适配器配置选项指定,并使用 DISPLAY_TEST_DIR 环境变量:
harness: display_capture
harness_config:
  pytest_dut_scope: session
  fixture: fixture_display
  display_capture_config: "${DISPLAY_TEST_DIR}/display_config.yaml"
工作流
首先,针对已知正确的显示输出生成 参考指纹:
# Build and flash the display test
west build -b <board> tests/drivers/display/display_check
west flash

# Configure for fingerprint generation mode by setting the 'operations' field to 'generate'
# in the configuration file.

# Generate fingerprints
export DISPLAY_TEST_DIR=<path-to-config-directory>
west twister --device-testing --hardware-map map.yml \
    -T tests/drivers/display/display_check/
指纹存放在配置文件 directory 字段指定的目录中,并按 metadata 字段定义的测试名称和平台组织。
生成指纹后,可在 比较模式 下再次运行测试:
# Set the 'operations' field to 'compare' in the configuration file.

export DISPLAY_TEST_DIR=<path-to-fingerprints-parent-directory>
west twister --device-testing --hardware-map map.yml \
    -T tests/drivers/display/display_check/
适配器按配置的签名方法和阈值,将捕获视频与参考指纹比较。如果参考指纹与捕获指纹的相似度超过配置的 threshold,测试通过。
备注
DUT 的
testcase.yaml中的测试名称必须与指纹元数据配置中的name字段一致。一个目录可以存放多个指纹以进行全面验证,但这会增加比较时间。
指纹与具体测试场景和平台均有关。